CMME: Design Toolkit
Contributions from Malorie Landgreen, Emily O’Hara, Robert Rayle, Michael Horvath, and Beth Malandain This post includes the design specifications for the final exhibit we created as the Museum of Science’s portion of the Creating Museum Media for Everyone (CMME) project. In addition to the physical specifications you will read about below, we also wrote a blog post where you can download the source code for this computer-based interactive. The design toolkit for this exhibit includes:
- Annotated technical drawings of the as-built casework
- Annotated digital and print graphic files
- High-contrast tactile model options
- Buttons and audio phone parts list
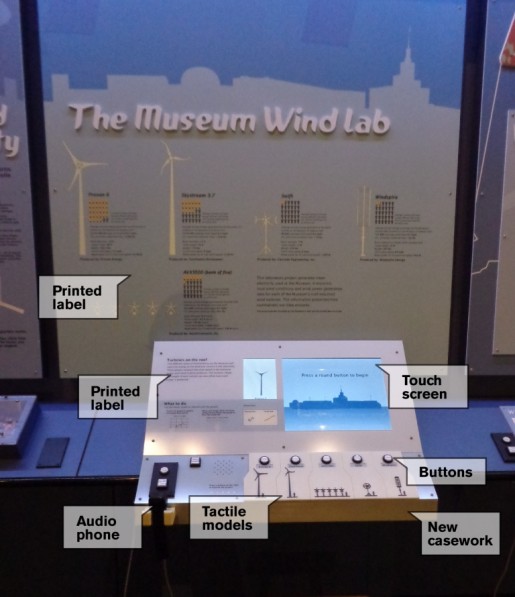 Picture of the final CMME exhibit with labels showing the locations of the printed labels, buttons, audio phone, tactile models, new casework, and touch screen.
Technical drawings:
The technical drawings for this exhibit show the as-built casework. You can download an annotated .pdf file of the CAD drawings for the exhibit by clicking here.
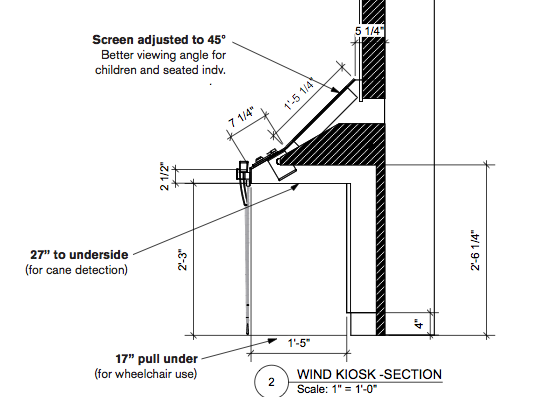 This exhibit was a refurbishment of an existing component, so you will see how we built the new casework over the previous design. These adjustments were made so that we could fit in the touchscreen and the control button interface, but we also made some design decisions for the new casework so that the final exhibit was more accessible. Some of these changes include:
- Relocating the audio phone to the front edge of the new casework
- Adding a speaker to play broadcast audio
- Adjusting the touchscreen to be mounted at a 45-degree angle for better viewing for children and visitors who were seated
- Lowering the underside of the kiosk to 27” to enable cane detection for visitors who are blind/have low vision
- Ensuring the new pull-under space was 17” deep to facilitate ease of use by wheelchair users
Digital and print graphics:
The annotated PDF of the digital and print graphics for this exhibit show the final designs used in the exhibit. The primary elements that were taken into consideration include:
- Font size for body copy of printed and digital labels should be no smaller than 22pt
- Contrast between the text and background of printed and digital labels for body copy is ideally at 70%
- A tactile touchscreen overlay that was clear, durable, and did not affect use of the touchscreen
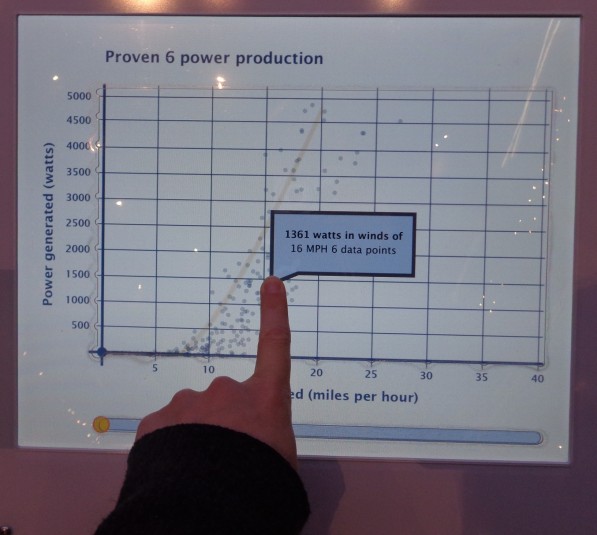 Picture of the touchscreen with the overlay. The edge of the cutout in the top layer of polycarbonate is visible along the graph axes.
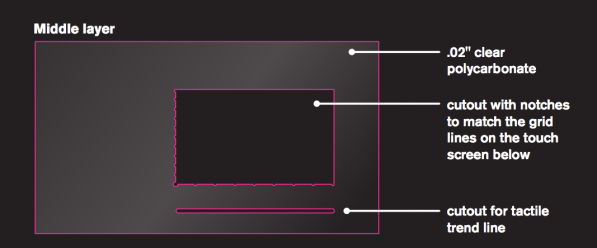 For the touchscreen overlay we used two adhered layers of the 0.020” from McMaster-Carr #85585K15. The top layer is cut so that the axes are tactile, with notches at each gridline, and the trend line slider below. The bottom layer protects the touchscreen.
High-contrast tactile models:
In order for the tactile scale models of the wind turbines to be useful for all visitors, we wanted them to be raised for use as touchable models, but also high-contrast, so that they were visible against the background. We had the tactile images made as 3D prints, but they can also be made as plastic casts.
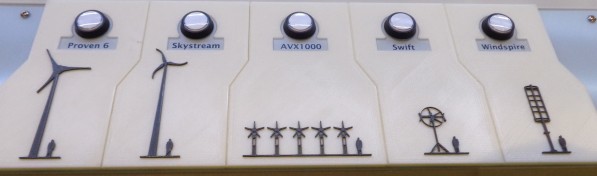 Picture of the five high-contrast, tactile wind turbine images, each with a representation of a six-foot person for scale. These tactile pieces are 3D prints.
To create the high-contrast, 3D-printed images, our exhibit designer used Adobe Illustrator software to draw the turbines to-scale with an image of a six-foot person next to each. The turbines were drawn within a larger background piece, so that all five would line up next to each other on the final exhibit and for durability. If each turbine was 3D-printed alone, the fineness of the turbines would not have allowed for a strong adhesion to a backing piece.
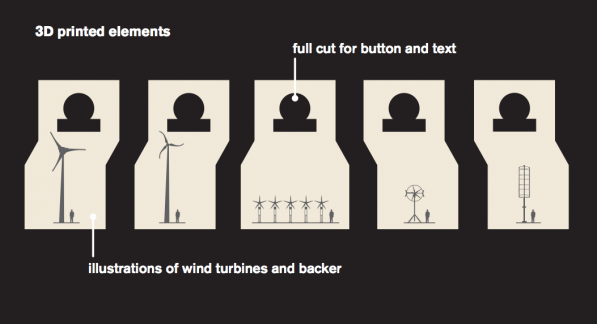 Image of the illustration that was used to create the 3D prints. This drawing was then converted into Vectorworks. The file was sent to PROTO3000 and they made the two-color 3D prints with the turbines in dark gray and the background in cream.
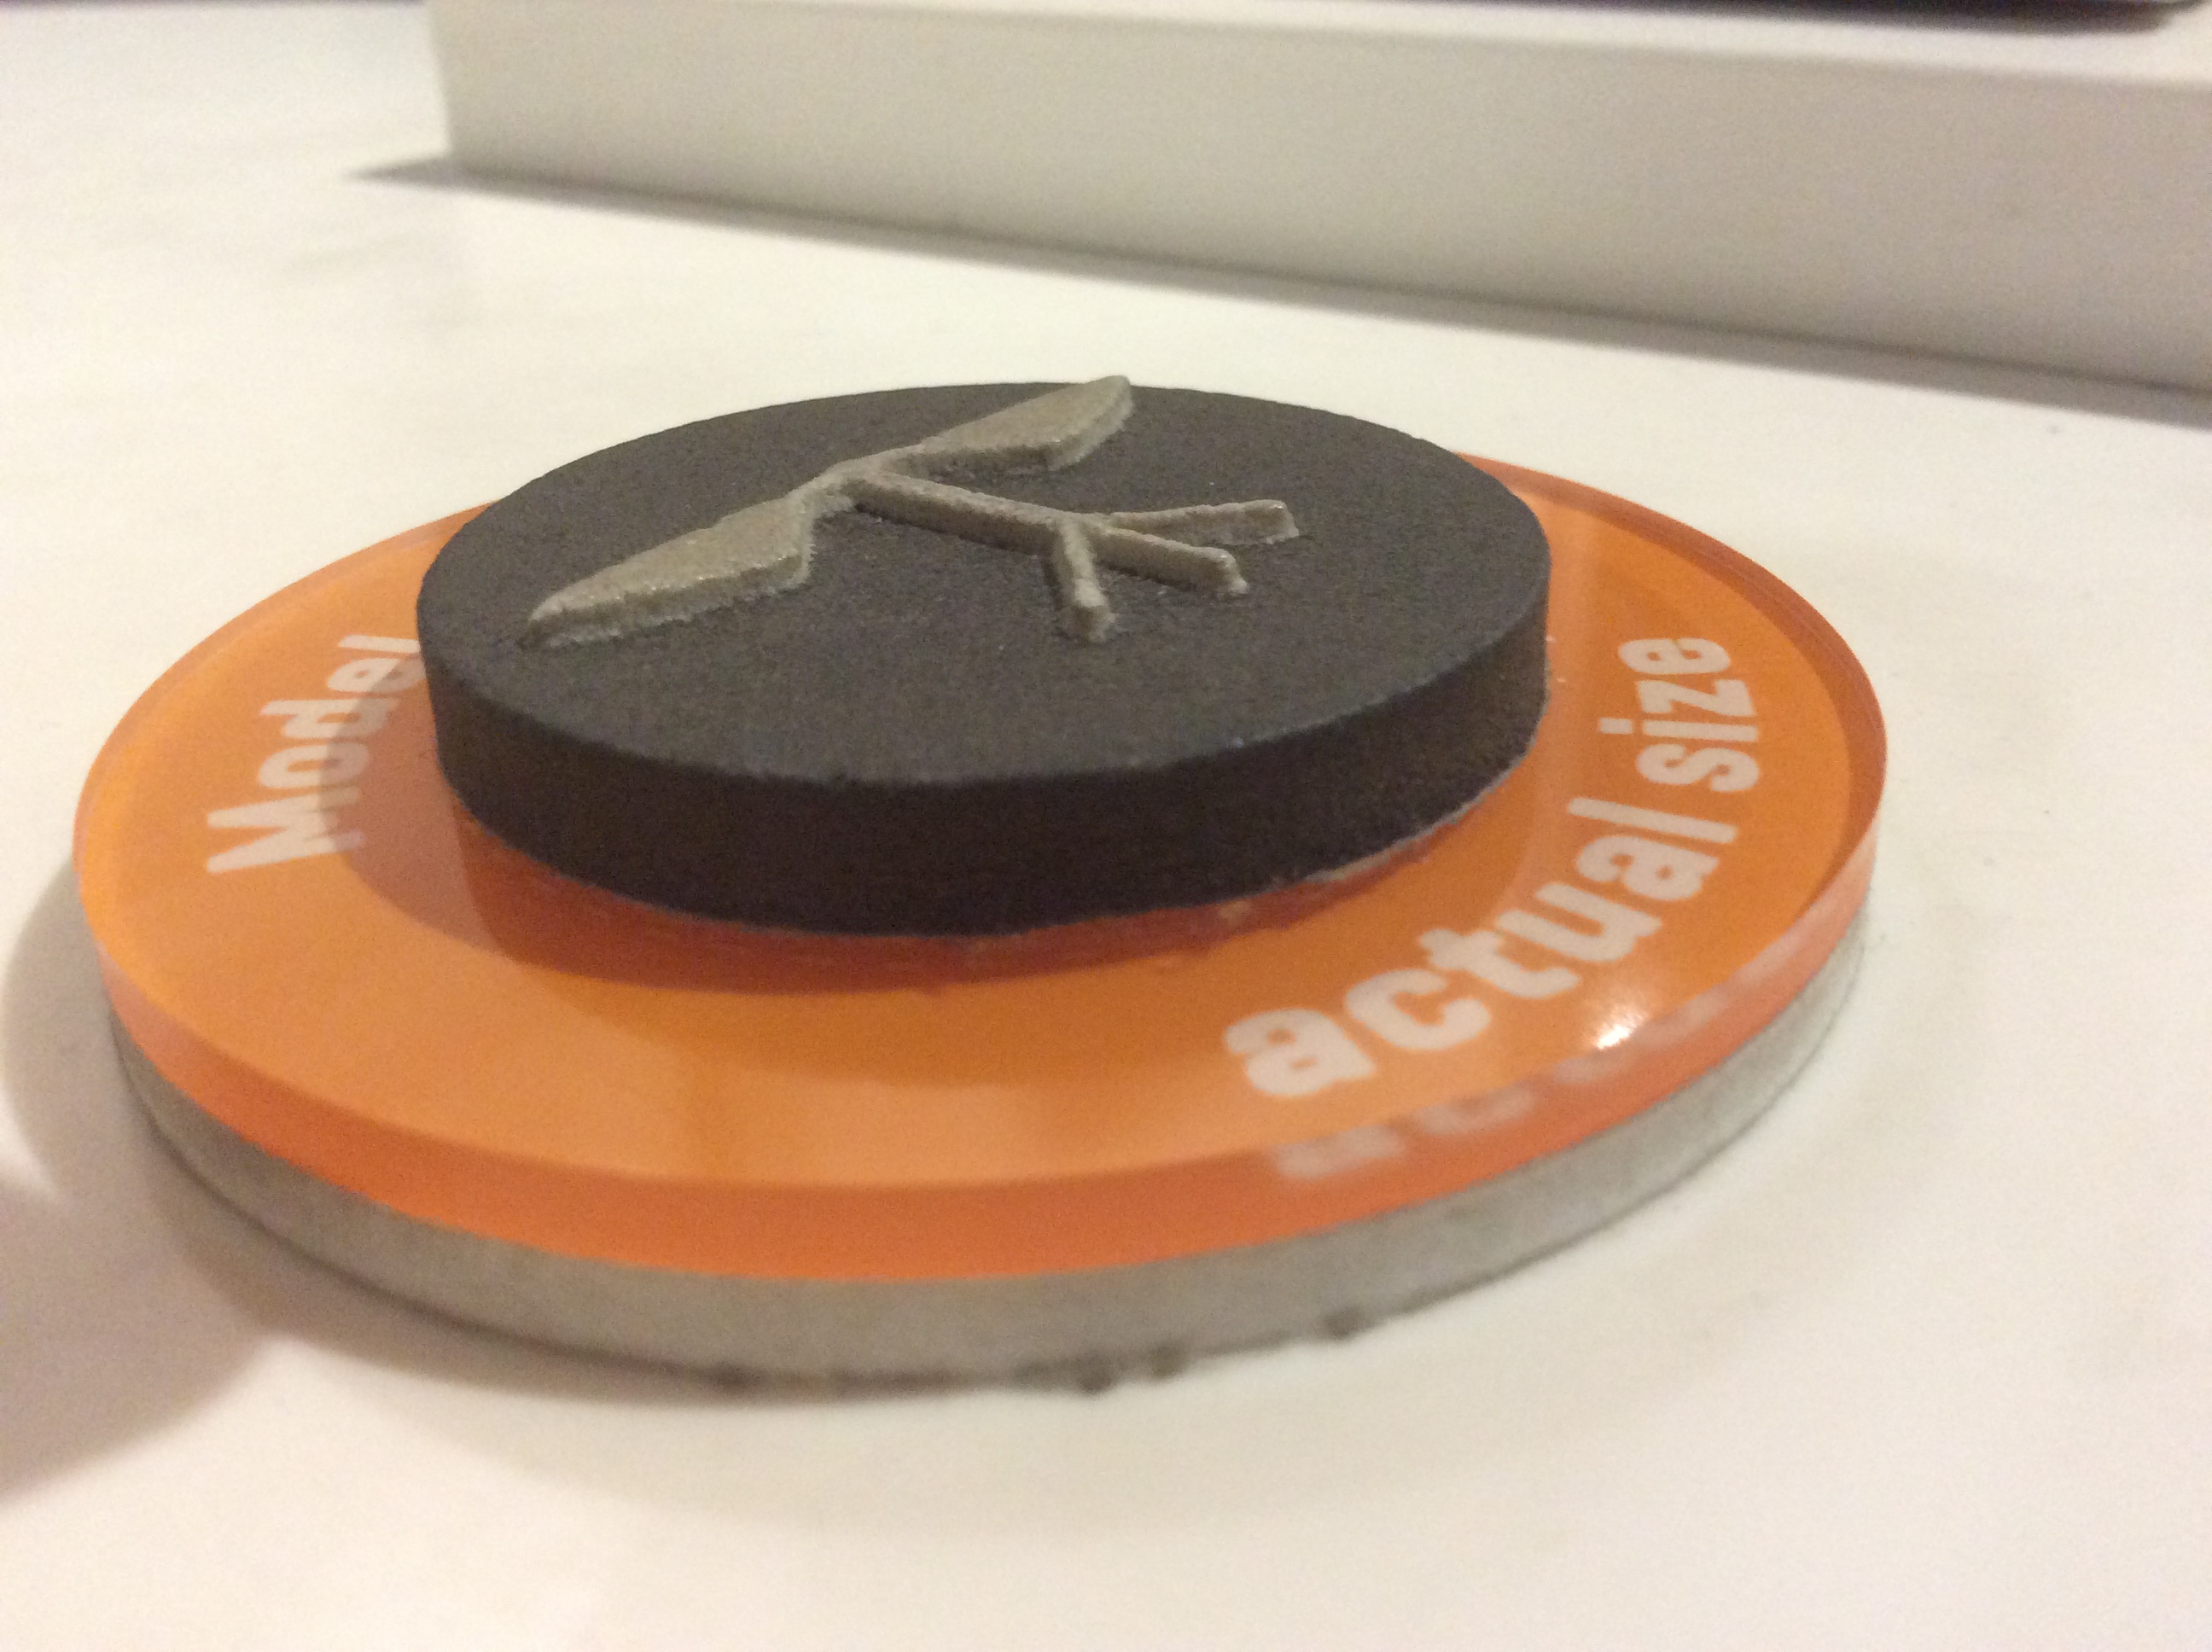
 Picture showing a close-up of the 3D printed turbines. The lines from the 3D printing are visible and they create a subtle texture that can be felt in the final product.
The five 3D-Prints (ABS-M30)cost$925.00, but they were the only way we were able to produce the fine lines of the wind turbine models. We were worried about the durability, but they have been on exhibit for almost six months and they are holding up well. None of the fine-lined pieces have broken.
If the durable, two-color 3D printing is out of your price range, creating a two-color plastic cast is another option. We used this technique for another exhibit and it has also held up well while on exhibit. For this technique, you could make your own object to create the mold, or have a single-color 3D-print of the object in a less durable material made (which is less expensive), and then use that print to create a mold to create your two-color cast. This also enables you to create extra copies of the tactile pieces as replacements, if they are ever needed.
 Side-view picture of a tactile model on display at the Museum. This tactile model was cast in two colors of plastic, grey and black, to create a high-contrast image that was touchable. You can see the shallow depth of the tactile piece against the background. We found that too much depth separating the image from the background made it harder for visitors to interpret the shape through touch alone.
Buttons and audio phone:
The buttons and audio phone technology we used for this exhibit match those we use in the rest of the Museum. These are products we have found to be durable and easy to maintain. We also try to keep them consistent so that visitors recognize how to interact with them throughout their Museum visit. We use illuminated buttons with 3-chip white LED lamps from Suzo –Happ. Our audio phones are Gorilla phones from Stop & Listen. Each of the Gorilla phones is hooked up to an audio player. We use the CFSound IV player from Akerman Computer Sciences (ACS).
by Emily O'Hara ![]() on December 31, 2014
on December 31, 2014