Kinect Enabled Gigapixel Viewer Part 1: Preparing the Kinect
This is part 1 of a three part tutorial on setting up the Kinect, creating your own Gigapixel image, and using the Kinect with the Gigapixel viewer. Part 1 focuses on setup, Part 2 focuses on creating a Gigapixel image, and Part 3 focuses on using the Kinect.
The Kinect is an amazing new piece of technology for Natural User Interfaces (NUI.) What this means is that the Kinect is great for designing interfaces which basically disappear in front of the user. What most people are familiar with are Graphical User Interfaces (GUI), which have things like buttons, menus, cursors, and icons. The concept of the Kinect is to give a chance for people to break away from those things and command a computer using physical motions or vocal commands without even necessarily touching it, like you’re some amazing computer wizard. Like Harry Potter meets Bill Gates.
At OpenExhibits, we have our TUIO Kinect Complete utility which opens up the door to start using the Kinect to interface with the framework instead of a touchscreen. Most recently, I updated the Gigapixel viewer to make sure it worked appropriately with the Kinect, and we have a fresh new package so you can use the Kinect Enabled Gigapixel Viewer after you’ve installed our TUIO Kinect Complete utility and do what everyone’s wanted to do since the dawn of computing: wave your arms wildly at your computer and have it do something.
First thing’s first, however. Before you can work with the Kinect, you will need our utility installed, which is included in the Kinect package. To install it, just run the “setup_tuio_kinect_complete-1.0.0.exe” file in the “air” folder with the AIR installer. The drivers used by this utility are open source, meaning you don’t have to pay for them ever, but more importantly meaning you cannot have these and the official Microsoft Kinect SDK installed at the same time. So if you’ve installed the Microsoft Kinect SDK, install these drivers on an alternate computer, or uninstall Microsoft’s drivers, or you will be sad.
Once you have this installed, you will need to run your “TUIO Kinect Tray” program, which will open up a window named “Contour.” If you dance around in front of your Kinect now and look at your screen, you’ll notice blobs with crosshairs or other possible markings appearing as you go in and out of the appropriate depths. This program is essentially a “blob tracker.” The Kinect works through its two infared sensors, spaced apart much like your eyes, which allow it to measure depth down to the millimeter up to 12 feet (4 meters) away. This program works by taking that depth data and making educated guesses about what depth information in front of it is a person. This is not what’s called a “skeletal viewer”, which is a Kinect program that interprets educated guesses on a person’s entire skeleton. This just tracks blobs, it’s very simple.
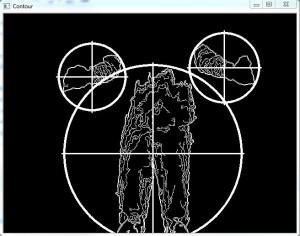
- The blob tracker
I’ll just say for now that you will want your Kinect set up on the edge of whatever you’re placing it on, whether it’s a desk, table, or shelf. You will want to stand approximately 6 feet away to achieve the ideal depth, though this may vary depending on conditions. I will talk more about the physical use of the Kinect later.
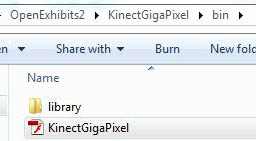
Now that your Kinect is set up and working, you will want to install the new exhibit, the Kinect Enabled Gigapixel exhibit. To install this, just run the KinectGigaPixel.AIR file located in the “air” folder of the project. This will automatically install the entire project for you.
For one, I feel I should point out that this package is actually using the GigapixelElement, which you’ll see in the CML. The difference between an Element and a Viewer is that Elements are primarily one item, that do one thing. Viewers use elements, and commonly wrap them up in a frame, with info and close buttons, and allow them to be manipulated about the entire stage. You can have multiple elements in a viewer, you can have multiple viewers on stage, and you can have multiple elements on stage as well, but the elements will likely be harder to interact with without being wrapped in some sort of container or viewer.
To run the project, make sure your Contour program that you installed earlier is running, then go to “<Installation Directory>/bin/KinectGigaPixel.swf” and run that file. The application should run full screen and you’ll end up with a massive image that you can then float through using motion gestures in front of the Kinect. If it seems awkward at first, our third tutorial will go over understanding the experience and setting up your Kinect space.
If you can see your gigapixel image, that’s great, but in this amazing package we included not just one, but two, two gigapixel images! But wait, how do you see the second one?
Well, if you’re new to this, I’m going to introduce you to CML, which is very much like XML. If you’re not new to this, this will be a helpful refresher. If you bothered to look at the Main.as file, you’ll notice there’s just not a lot there, that’s because the OpenExhibits libraries handle mostly everything. What you want to do is take a look at the .cml file, which you can find in your “KinectGigaPixel/bin/library/cml/” folder, titled “GigapixelElement.cml”, appropriately enough. You’ll want to open that up in your favorite .xml editor, such as Notepad++.
CML (Creative Markup Language) is being developed for OpenExhibits as a way to easily lay out an exhibit, or application using our libraries to create complete, custom exhibits. When you open up the CML file, you’ll find various things in tags using angle brackets that look somewhat like <this />, and these things can actually be combined in used in various ways to create custom displays, but like I said earlier, all you need right now is the <GigapixelElement/> tag. Within the brackets of your <GigapixelElement/> tag, there’s an attribute called “src”, this is the file that the GigapixelElement is looking up to find all its images to create the gigapixel image that you see. Right now the file it’s set to should end in “space.xml”.

- If your tag does not include “class”, or “id”, that’s all right, those are optional.
So with your CML still open so you can edit, navigate to your “KinectGigaPixel/bin/library/assets/deepzoom/” folder. You should notice two folders, and two XML files. The folders are where the images that are linked to the appropriate XML files are. You don’t need to edit these, you just need to learn where these files are and where they go in case you decide to make your own. Here, you should be able to see your “space.xml” file that’s filling out the “src” tag in your CML. Now you can change that attribute in your CML tag to the other file in the folder, “wise2012-003-b.xml”. Leave the rest of the folder branch in the filename, however, so it should look like this: “library/assets/deepzoom/wise2012-003-b.xml”. Now if you go back and run your program again, you should have a completely different panorama.
Now, this is great, and this information is also very useful if you’re using the normal GigapixelElement or Viewer without the Kinect. You can also customize the program to display your own gigapixel images that you create, but what if you don’t know how to make them? That’s all right, I give a rundown in the second part of this tutorial on how to use Deep Zoom Composer to create your own gigapixel images out of large, high res images, or combinations of smaller images. In the third part, I’ll give you a complete rundown of how to set up the physical space around your Kinect and how to interact with it to view the Gigapixel images.
by Joshua Hicks ![]() on September 14, 2012
on September 14, 2012
Hey great post! We’re getting started with the Kinect but ran into setup issues. But, it seems the setup errors (with the OpenKinect driver install) are due possibly to the fact that we’re running Kinect for Windows and not the XBox Kinect. Can you verify which hardware we must be running in order to develop for Kinect with OpenKinect drivers and your gesture library? Thanks!
Chris
If you have the Microsoft drivers for the Kinect installed, you will need to uninstall them and use /download/tuio-kinect-complete/ instead. That package contains everything you need. You could take the Kinect right out of the box, install the TUIO Kinect Complete Utility, plug the Kinect in when it tells you to and be ready to go (most likely after a restart.) If you have other open-source drivers, you may like to uninstall those as well to avoid conflict in the event they’re different than the libfreenect version our utility uses. This all should work on Windows.
Please post support requests on the forum (http://forums.openexhibits.org/). Thanks.